How to choose your first lens: Recommendations for student photographers
Disclaimer: “This post is sponsored and not my work, consider it a guest photographer stepping into my darkroom to help keep the lights on!”
Choosing your first lens as a beginner photographer marks an exciting milestone in your creative path. It’s the moment when you start shaping your visual identity and learning how different lenses affect composition, lighting, and emotion in a photo. The lens you choose doesn’t just determine technical quality—it defines how you’ll explore the world through your camera and develop your personal style.
Many students begin with a standard kit lens, which offers flexibility but limited creative control. Understanding what makes the best lens for beginners allows you to step beyond those limitations and achieve sharper, more expressive results. Just like a writer refining their skills through tools like an AI checker essay to enhance clarity, photographers use their first lens to refine how they tell visual stories. This guide explains the key elements of lens selection, helping you make a confident, informed choice that supports your growth as a student photographer.
Understanding Lens Basics: What You Need to Know
Before buying your first lens for beginner photographers, it’s essential to understand the technical side of lenses and how they affect your images.
Focal Length and Perspective
Focal length, measured in millimeters (mm), determines how much of a scene your camera captures. Here’s a quick overview:
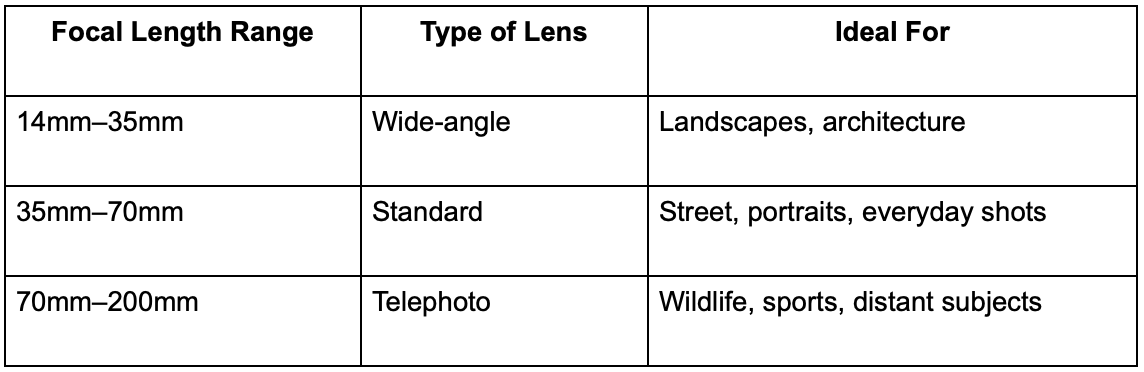
Knowing which focal length for first lens suits your style helps you make a confident choice.
Prime vs. Zoom Lenses
Prime lenses have a fixed focal length (e.g., 50mm). They’re lighter, sharper, and great for learning composition.
Zoom lenses offer flexibility (e.g., 18–55mm), making them useful for beginners exploring various subjects.
Aperture and Depth of Field
A lens with a wide aperture (like f/1.8) lets in more light and creates a beautiful blurred background—ideal for portraits.
Crop vs. Full Frame
If your camera has a smaller (crop) sensor, it increases the effective focal length. For example, a 50mm lens acts more like a 75mm lens on a crop sensor camera. Understanding this helps you match your lens to your camera’s body type when building your student photography gear first lens setup.
Define Your Shooting Style and Goals
Your first lens should reflect your interests as a photographer. Instead of asking what others use, think about what you enjoy shooting most.
For Portrait Enthusiasts
If you love capturing people, expressions, and emotions, a 50mm f/1.8 (often called the “nifty fifty”) is one of the best lenses for beginners. It offers a natural perspective and gorgeous background blur that instantly makes photos look professional.
For Landscape and Architecture Lovers
A wide-angle lens (between 18mm and 35mm) captures sweeping views and depth. These lenses help you explore scenery, cityscapes, and creative angles.
For Street and Travel Photography
A versatile 24–70mm or 18–55mm zoom lens is great for on-the-go shooting. It lets you adapt to different distances and lighting conditions without constantly changing lenses.
For Experimentation
If you like creative close-ups, a macro lens lets you explore fine details like textures or insects. A fisheye lens can add artistic distortion for fun, experimental shots.
Grab this quick tip list that will help you match style to lens:
Portraits → 50mm or 85mm prime
Landscapes → 18–35mm wide-angle
Street → 24–70mm zoom
Macro → 60mm or 100mm macro
By aligning your goals with your lens choice, you’ll invest in gear that keeps you inspired—an essential mindset when selecting your student photography gear first lens.
Compatibility, Budget, and Brand Choices
Even the most enthusiastic student can feel overwhelmed by lens options. To simplify things, consider three main factors—compatibility, budget, and brand.
Lens Mount Compatibility
Before purchasing, confirm that the lens fits your camera’s mount. For example:
Canon → RF or EF mount
Nikon → Z or F mount
Sony → E mount
Choosing the right mount ensures autofocus and stabilization work properly.
Budget-Friendly Options for Students
You don’t need to spend a fortune to find the best lens for beginners. Some affordable and reliable options include:
Canon EF 50mm f/1.8 STM
Nikon AF-S DX 35mm f/1.8G
Sony E 50mm f/1.8 OSS
Sigma 30mm f/1.4 DC DN (for multiple mounts)
Third-Party Lenses
Brands like Sigma, Tamron, and Viltrox often offer lenses with equal or better quality at lower prices. They’re a wise choice for students upgrading from a kit lens.
Buying New vs. Used
A refurbished or used lens can be a good deal if bought from a reputable source. Always check:
Scratches on the glass
Autofocus functionality
Internal dust or fungus
Here is a comparison table:

This helps students see the benefits of investing in a dedicated first lens vs kit lens upgrade.
4 Tips for Testing and Maintaining Your First Lens
Once you’ve chosen your lens, the next step is to learn how to use and care for it properly. This ensures it performs well and lasts throughout your student years and beyond.
#1: Test Before Buying
If possible, visit a local store or rent a lens to test it. Check for:
Sharpness: Zoom in on the image to inspect details.
Autofocus accuracy: Ensure focus locks quickly and precisely.
Comfort: See if the lens feels balanced with your camera body.
#2: Essential Accessories
To protect your student photography gear's first lens, invest in:
A UV filter for protection against scratches and dust
A lens hood to reduce glare and improve contrast
A cleaning kit (microfiber cloth, air blower, and solution)
#3: Proper Maintenance Habits
Store lenses in a dry place, ideally with silica gel to prevent fungus.
Clean the lens gently from the center outward.
Avoid touching the glass with your fingers.
Always use front and rear caps when storing.
#4: Final Tips for Long-Term Value
Practice using manual focus to improve your precision.
Experiment with different focal lengths to discover your comfort zone.
Revisit the first lens vs kit lens debate after some experience—your needs may evolve.
Learning to maintain and test your lens builds confidence and prolongs your equipment’s life, ensuring every photo reflects your effort and creativity.
Bottom Line
Your first lens for beginner photographers is more than just a piece of glass—it’s your creative foundation. Whether you start with a 50mm prime or a versatile zoom, focus on how it supports your goals and encourages experimentation. With the right balance of understanding, compatibility, and care, your student photography gear first lens can accompany you through years of growth and discovery. Every shot you take will teach you something new—and that’s the true beauty of photography.